WordPress User Roles and Settings Explained: How to Customize User Roles
This is a phrase used to specify the activities or operations a particular user is permitted to carry out on a WordPress blog or eCommerce website. User roles are predefined WordPress roles that can be assigned to WordPress users to give them privileges on the site.
The user role of each user determines the kind of actions the users can carry out on WordPress.
Some user roles can perform some technical functions while others have limited functionality.
WordPress Default User Roles Explained
Here are the six default user roles in WordPress with a short explanation about what they do and how they work-
Super Admin
The Super Admin is only available in a WordPress multisite network. The super admin can manage a network of several sites installed in a WordPress Multisite installation. The Super Admin is not activated by default unless you activate the multisite function on your WordPress site.
Administrator
The administrator is automatically created when you install WordPress. The administrator can manage a single site in a standard WordPress installation or a single site within a Multisite network. The administrator has all the privileges. the administrator can add new users, new posts, and new pages to a WordPress site and can also delete a user, a post, and pages on WordPress.
This user role gives the Administrator the power to control everything on the site. The administrator can also add and remove a plugin and can also edit the WordPress core files.
Editor
The editor is another WordPress user role with the capability to edit, create, delete, publish, and manage any post on the WordPress site including the ones created by others.
However, the editor does not have access to the website settings and cannot modify the website themes, plugins, or core files. Also, an editor can moderate, edit, reply, and delete comments.
Author
An author can only write, edit, publish, and manage their posts only. Authors can see comments made by others but can not moderate user comments. Also, authors do not have administrative rights to the settings, plugins, or themes on the site.
Contributor
A contributor can only write and manage their posts but cannot publish. A contributor is a fairly limited role as it cannot upload media files, all posts are submitted for approval. They can view comments but cannot edit, accept or reject comments on the site. The contributor user role does not also have access to the core files, settings, themes, and plugins on your WordPress site.
Subscriber
This is a user role that is best for users that are visiting your websites. They do not need administrative access to your site, they can not add content but can view content and make comments only and they do not have access to the administrative backend.
They only have access to their profiles and can make changes to their profiles.
Here’s a short video that explains default WordPress user roles-
How to Add Users in WordPress and Assign Them Roles
To add a user role in WordPress is pretty easy.
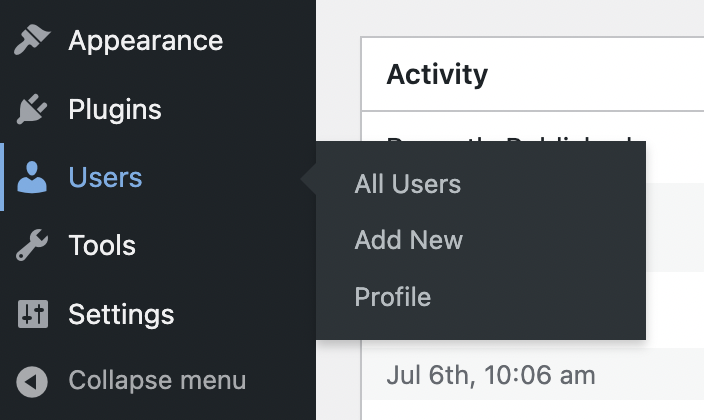
On your Dashboard, go to Users >> Add New, select your preferred user role, enter the username, email, name, password, and other information that is needed, and save changes. Check the screenshot below-
The new role is automatically created and the new user can sign in by entering the information provided during registration.
How to Add Custom User Roles in WordPress
There are multiple ways in WordPress to add a custom user role.
You know that sometimes it’s very important to add additional user roles to smoothly manage your WordPress site or eCommerce marketplace. The more complex site the more user roles. As WordPress provides only six user roles by default, you need to follow alternative ways to add your needed specific roles.
Let us explore a few easy ways to get your job done.
Use A WordPress Custom User Role Plugin
You may like to use a plugin instead of adding custom code. To create new user roles you can use the WP User Frontend or Members plugin. These are very popular user and role management plugin that was created to make WordPress a more powerful CMS.
Creating a New User Role with plugins
After installing and activating this plugin navigate to
- wp-admin → Users → Add New Role
- Enter the role title (e.g Comments Moderator)
- Select the capabilities for this new user role (e.g. moderate comments, read)
- Click on Add Role button
Now, go to wp-admin → Settings → General, and click on the New User Default Role dropdown field.
You can see the newly created user role listed along with the default user roles. Just choose any user roles you may need.
It’s very easy, right?
Custom Code Method to Add Custom User Role in WordPress
WordPress is the number one CMS in the world and it is popular for its open-source nature. This means you have the opportunity to customize WordPress the way you want and it’s completely FREE. Just like that WordPress gives you the opportunity to create a custom user role by using a function called add_role();
There are three parameters in add_role() function.
- add_role( $role, $display_name, $capabilities );
- $role (string) (required): Unique name of the role
- $display_name (string) (required): The name to be displayed
- $capabilities (array) (optional): Capabilities that one can access
Let’s create a new user role named Custom Editor with read and edit posts capabilities. Include the following lines of code toward the end of your functions.php, which is located in your theme folder.
[php] add_role( ‘custom_editor', __( ‘Custom Editor' ), array( ‘read' => true, // true allows this capability ‘edit_posts' => true, ) ); [/php]Now save the file, and log in to your site with an admin account. Navigate to Settings → General. You can see the newly created user role in the user list.
That’s all, you can assign a user to this role from the WordPress admin panel, also you can also set this role as a New User Default Role.
WordPress Settings Explained

These refer to the default or custom configurations that can be made to a WordPress website or plugins to have them work the way you want them to.
Settings allow you to make changes to your site and control how your site is displayed. The settings offer changes to the website’s title, tagline, language, and visibility. The setting is divided into the 7 following parts:
a. General: This setting allows you to make basic changes to your site configurations such as the page title, it also lets you set your tagline and customize your site address, and lastly lets you also set your location. The General settings also let you set the default User Role when a new user registers. You can also change the language settings, customize the time zones, and change the dates and time format. Lastly, It also allows you to switch on or off registration on your site.
b. Writing: This option allows you to set the default post category for your blog, and your default post format, you can also set the option of posting via email.
c. Reading: This setting lets you customize what is displayed on the front page. These are the settings that allow you to set the front page to show either the latest blog post or a static page. It also allows you to set the homepage and the posts page and the number of posts you want to be displayed on the front page or the post pages and categories.
d. Discussion: The discussions provide options mostly for comments on the site. It allows you to set whether you want comments on the site or not. You can also set parameters for comments and comment moderation.
e. Media: This is where you can set default settings to your media files mostly images. You set the width and height for your thumbnail size, medium size, and large size. It also allows you to organize your new uploads into months and years.
f. Permalink: The permalink provides the ability to create a custom URL structure for your site permalink and archives. It allows you to create custom structures such as plain, day and name, month and name, Numeric, Post name, and custom structure.,
g. Privacy: This provides the option to create or set your privacy policy page.